The Modal Form Plugin
Obsidian is a versatile tool for organizing notes and ideas. However, managing structured data often requires extra effort. The Obsidian Modal Form plugin simplifies this process, enabling users to create custom forms for data entry.
The Obsidian Modal Form Plugin⌗
The Obsidian Modal Form plugin allows users to create forms that gather structured information directly within Obsidian. Instead of manually typing data into notes, users can rely on predefined forms to streamline input. This feature improves consistency, reduces errors, and saves time.
How the Plugin Works⌗
The plugin relies on JSON definitions to specify form fields. Users create these definitions in the plugin’s settings or through external configuration files. Each field can have a label, input type, and default value.
Available input types:
- number
- date
- time
- slider
- toggle (true/false)
- free text
- text with autocompletion for note names (from a folder or root)
- text with autocompletion from a dataview query (requires dataview plugin)
- multiple choice input
- select from a list
- list of fixed values
- list of notes from a folder
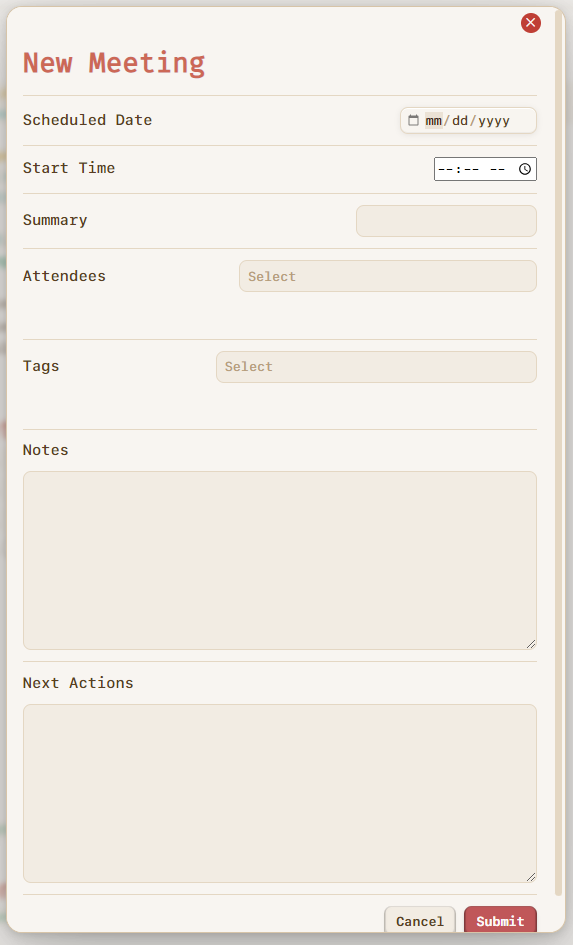
For example, a form to capture meeting notes might include:
- Scheduled Date (date picker)
- Start Time (time picker)
- Summary (input text)
- Attendees (multi-select)
- Tags (tags picker)
- Notes (text area)
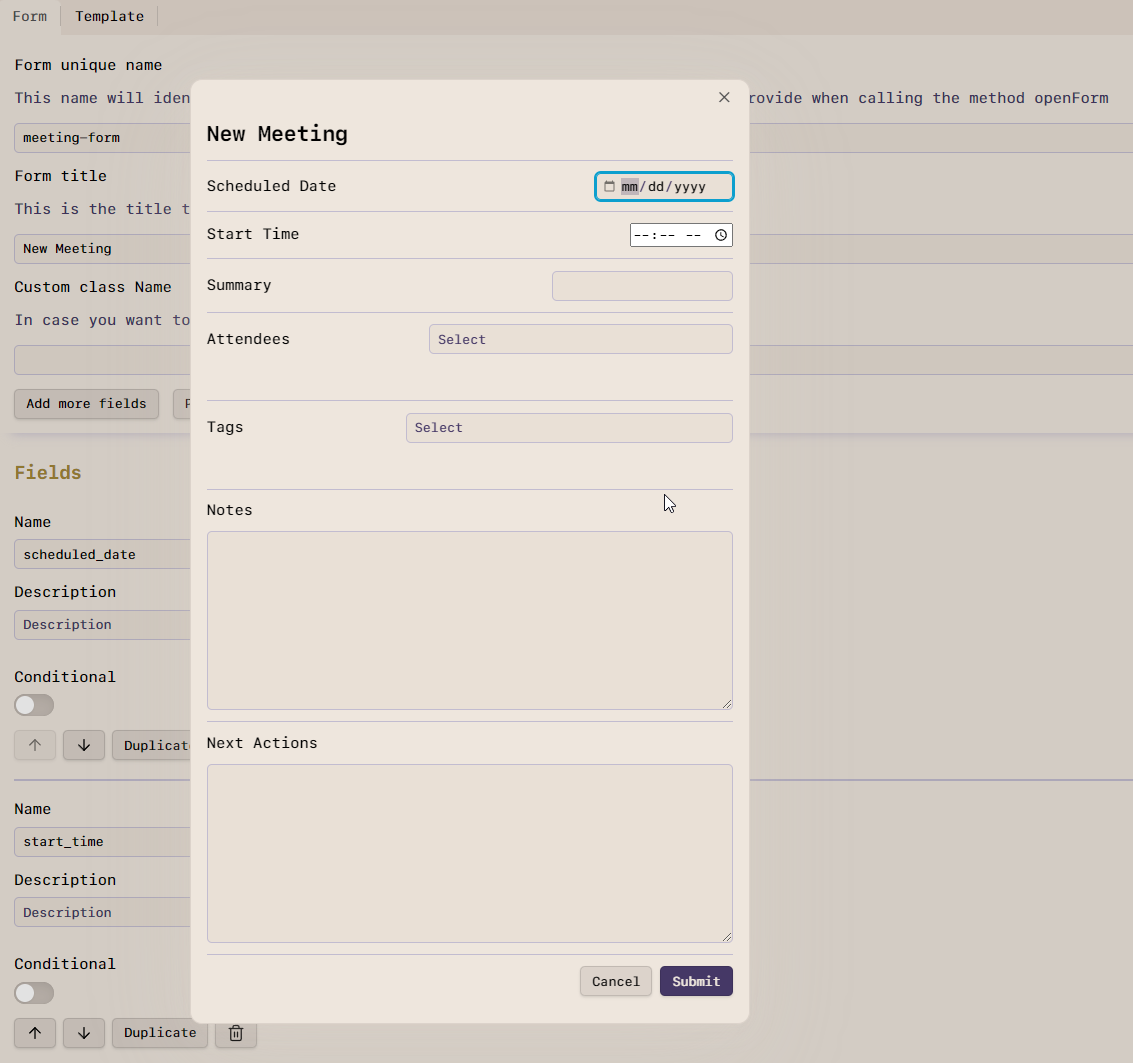
Once configured, forms can be opened using commands or integrated with other Obsidian plugins, such as Templater and QuickAdd.
Unlike Templater and QuickAdd, which focus on capturing one value at a time and lack labels or detailed descriptions, the Modal Form plugin allows users to input multiple values simultaneously. It also supports field descriptions and allows skipping fields, offering greater flexibility and clarity during data entry. After submitting a form, the data is inserted directly into a note in a structured format.
Create a form⌗
To create a new modal form, you can:
- Click on the ribbon icon associated with the plugin.
- Alternatively, press
Ctrl+P(orCmd+Pon Mac) to open the Command Palette, then search for and selectObsidian Modal Form: New form.
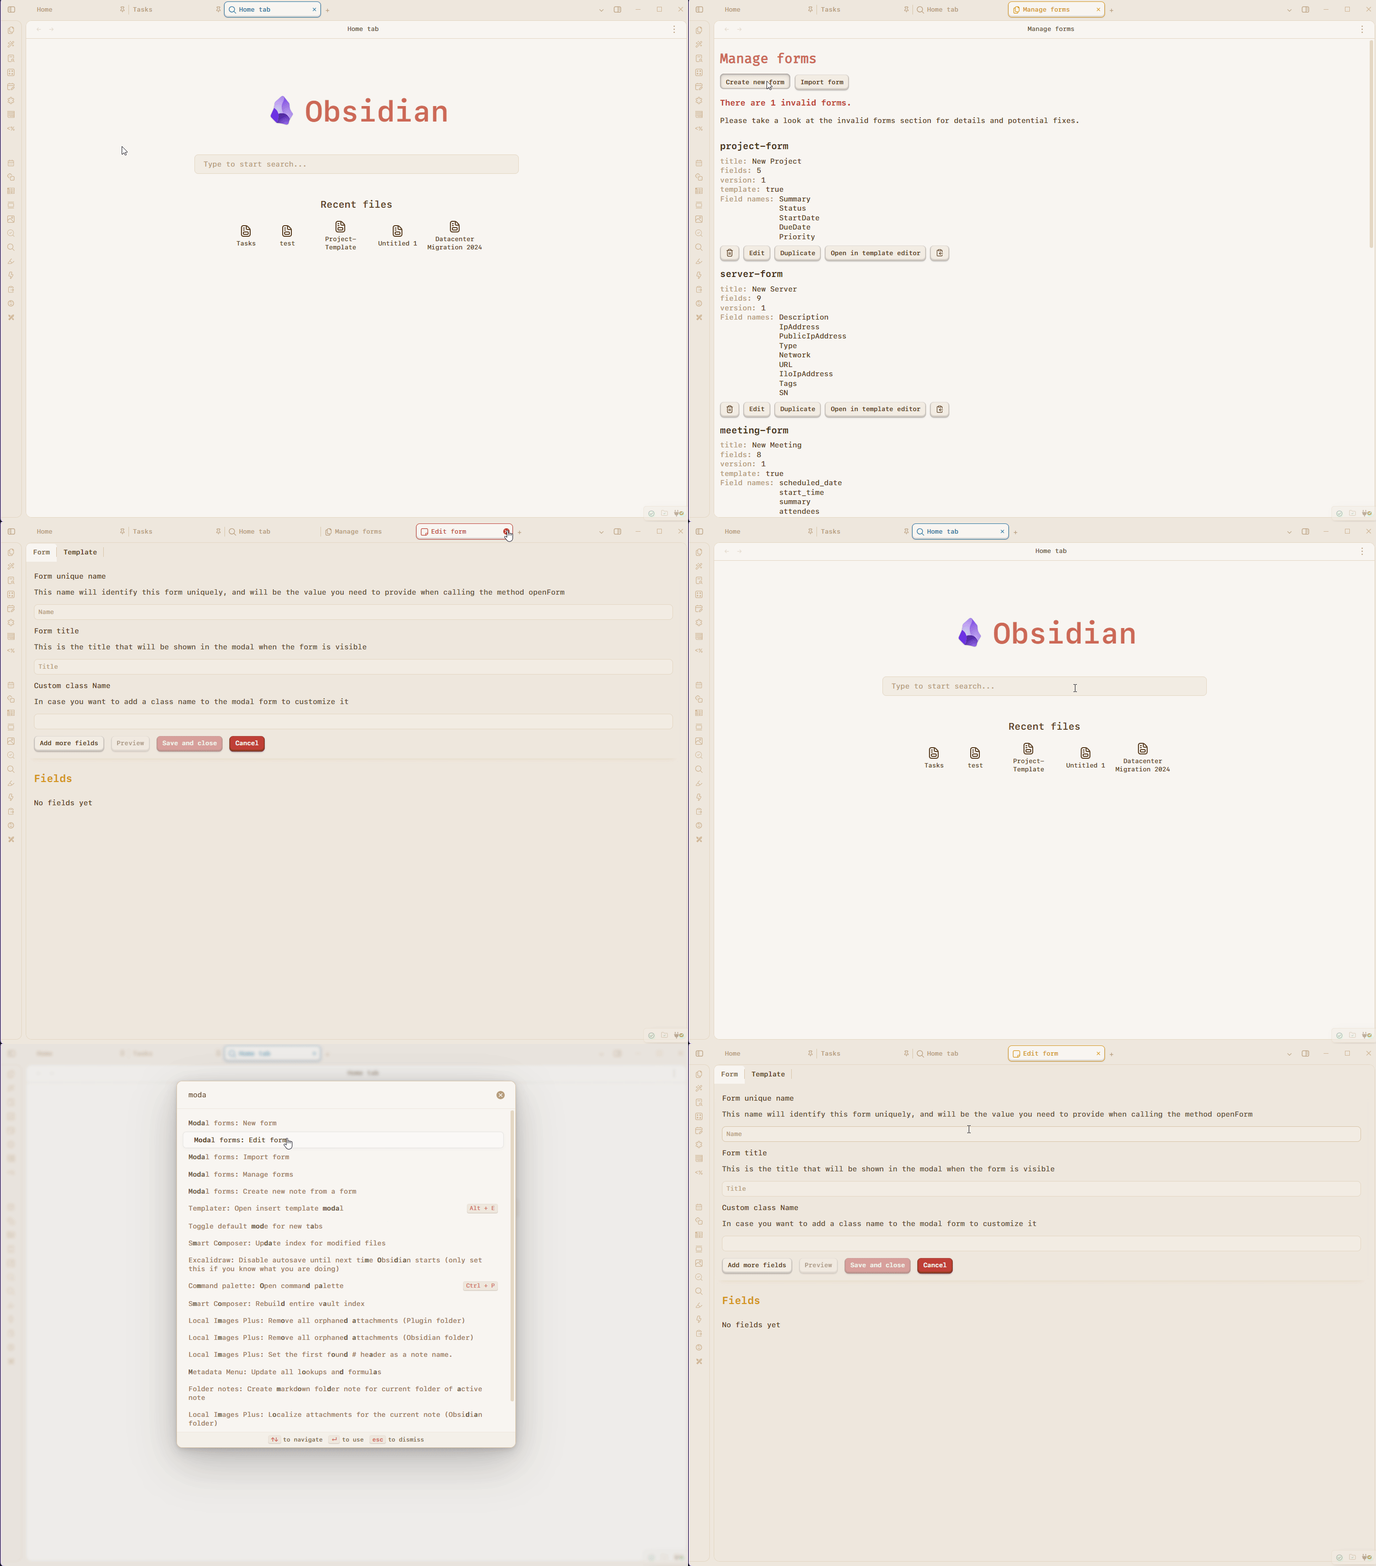
Then, in the Manage Forms view, click the + button to initiate a new form. Provide a unique name for the form; this identifier is case-sensitive and will be used to reference the form in scripts. Enter a title for the form, which will appear as the header in the modal window.
Add fields by specifying: - Name: A unique identifier for the field. - Label: The user-facing name displayed in the form. - Description: Optional text providing additional information about the field. - Input Type: Choose from various types such as text, number, date, time, slider, toggle, select, or multi-select. - Ensure all fields have valid configurations; the form cannot be saved if any field is invalid.
There’s a Preview button that allows you to view how the form will look like.
Save the Form:
- After configuring the fields, click the Save button to store the form definition.
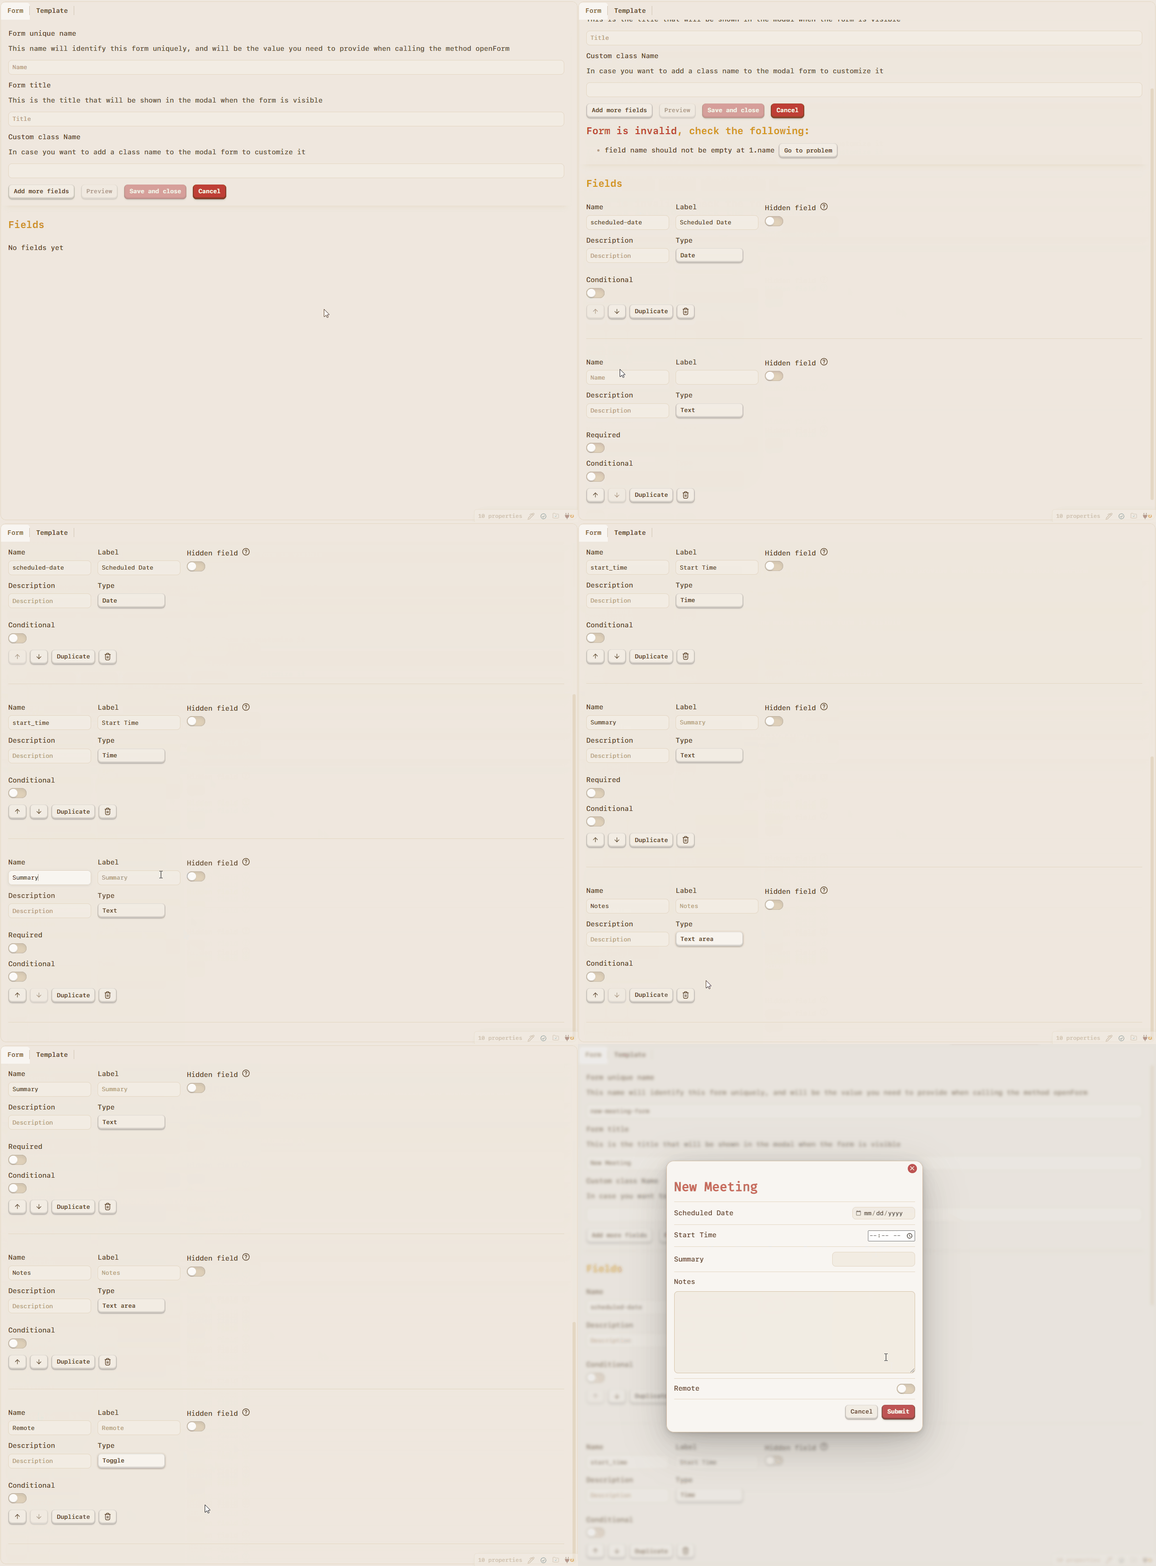
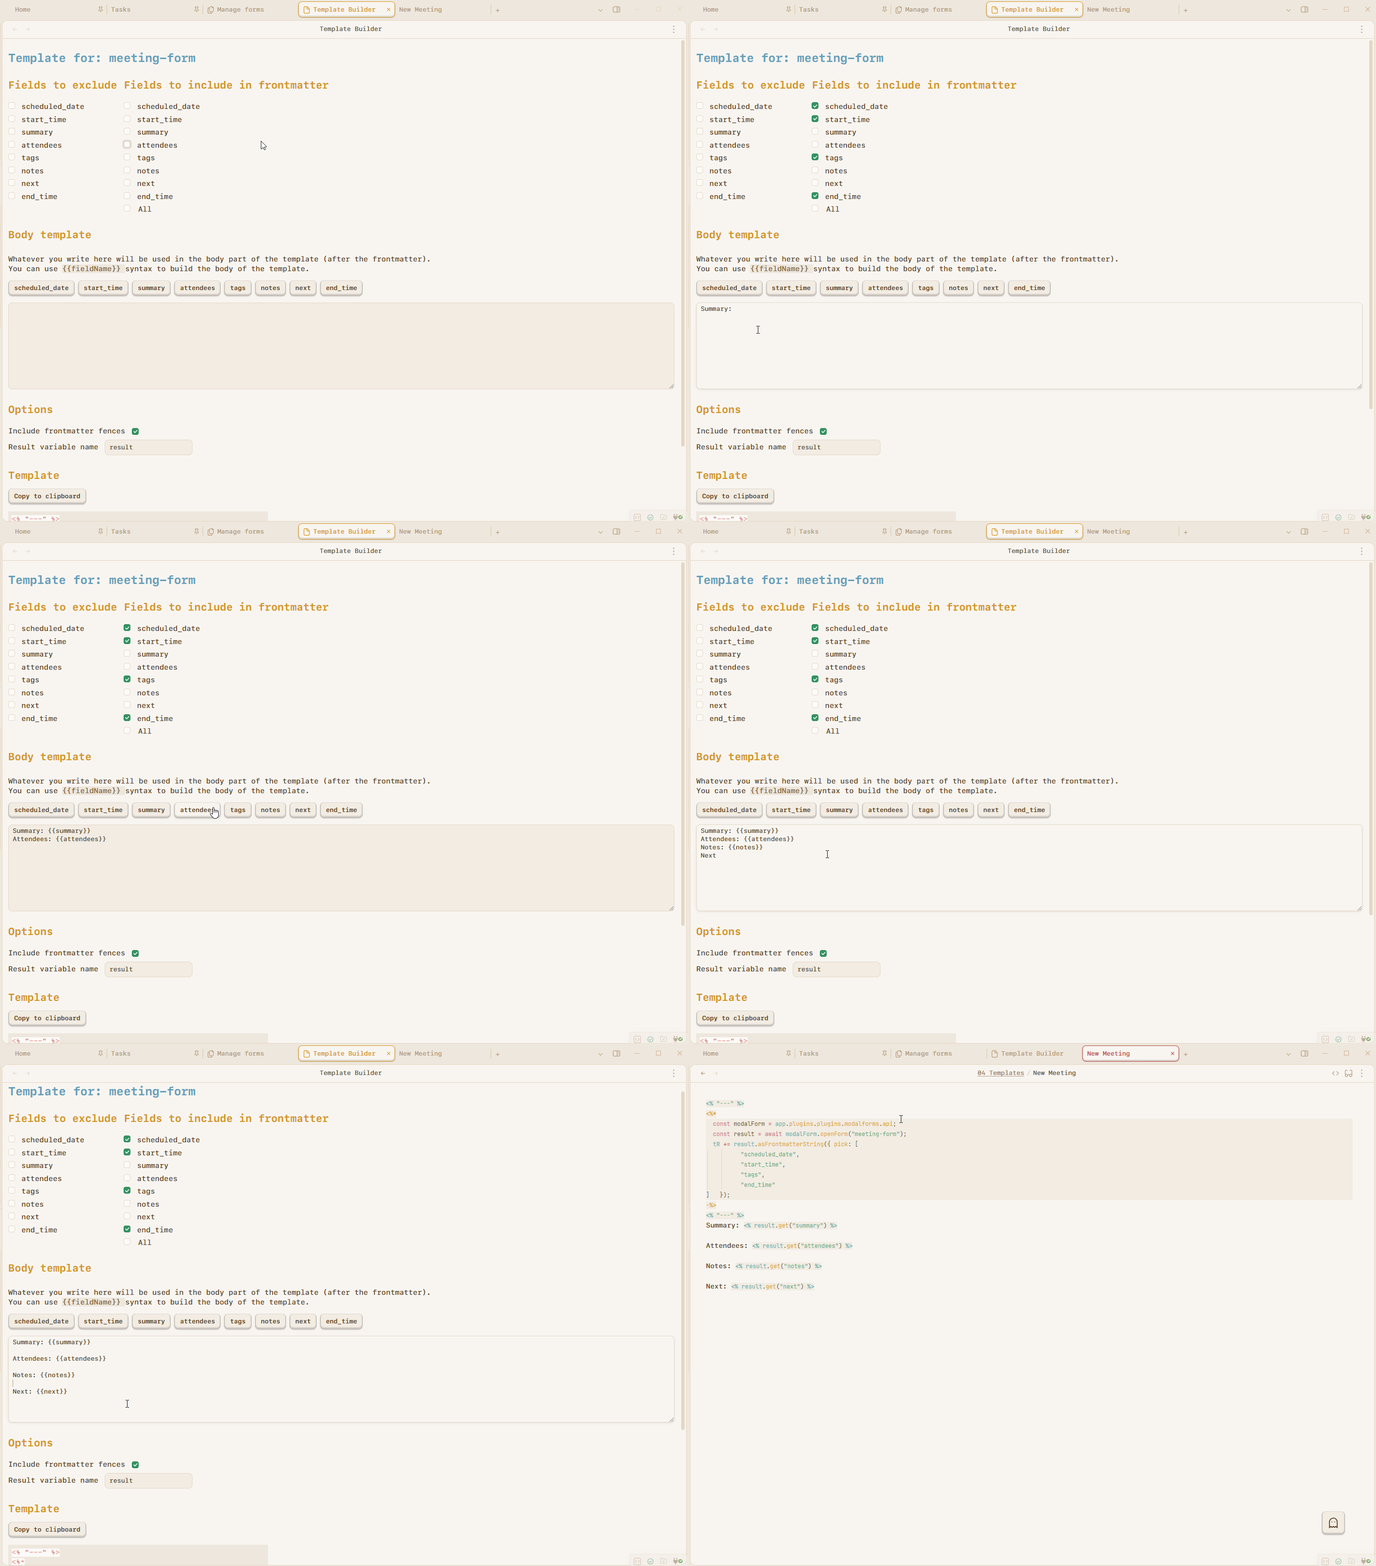
Clicking the Template tab allows you to create basic templates using the variables returned by the form. As you use these variables, they are automatically marked as checked in the fields list. Once you’ve saved the template, you can run Modal Form: Insert from template from the command palette, select the desired template, and it will trigger the form and insert the output into the focused note.
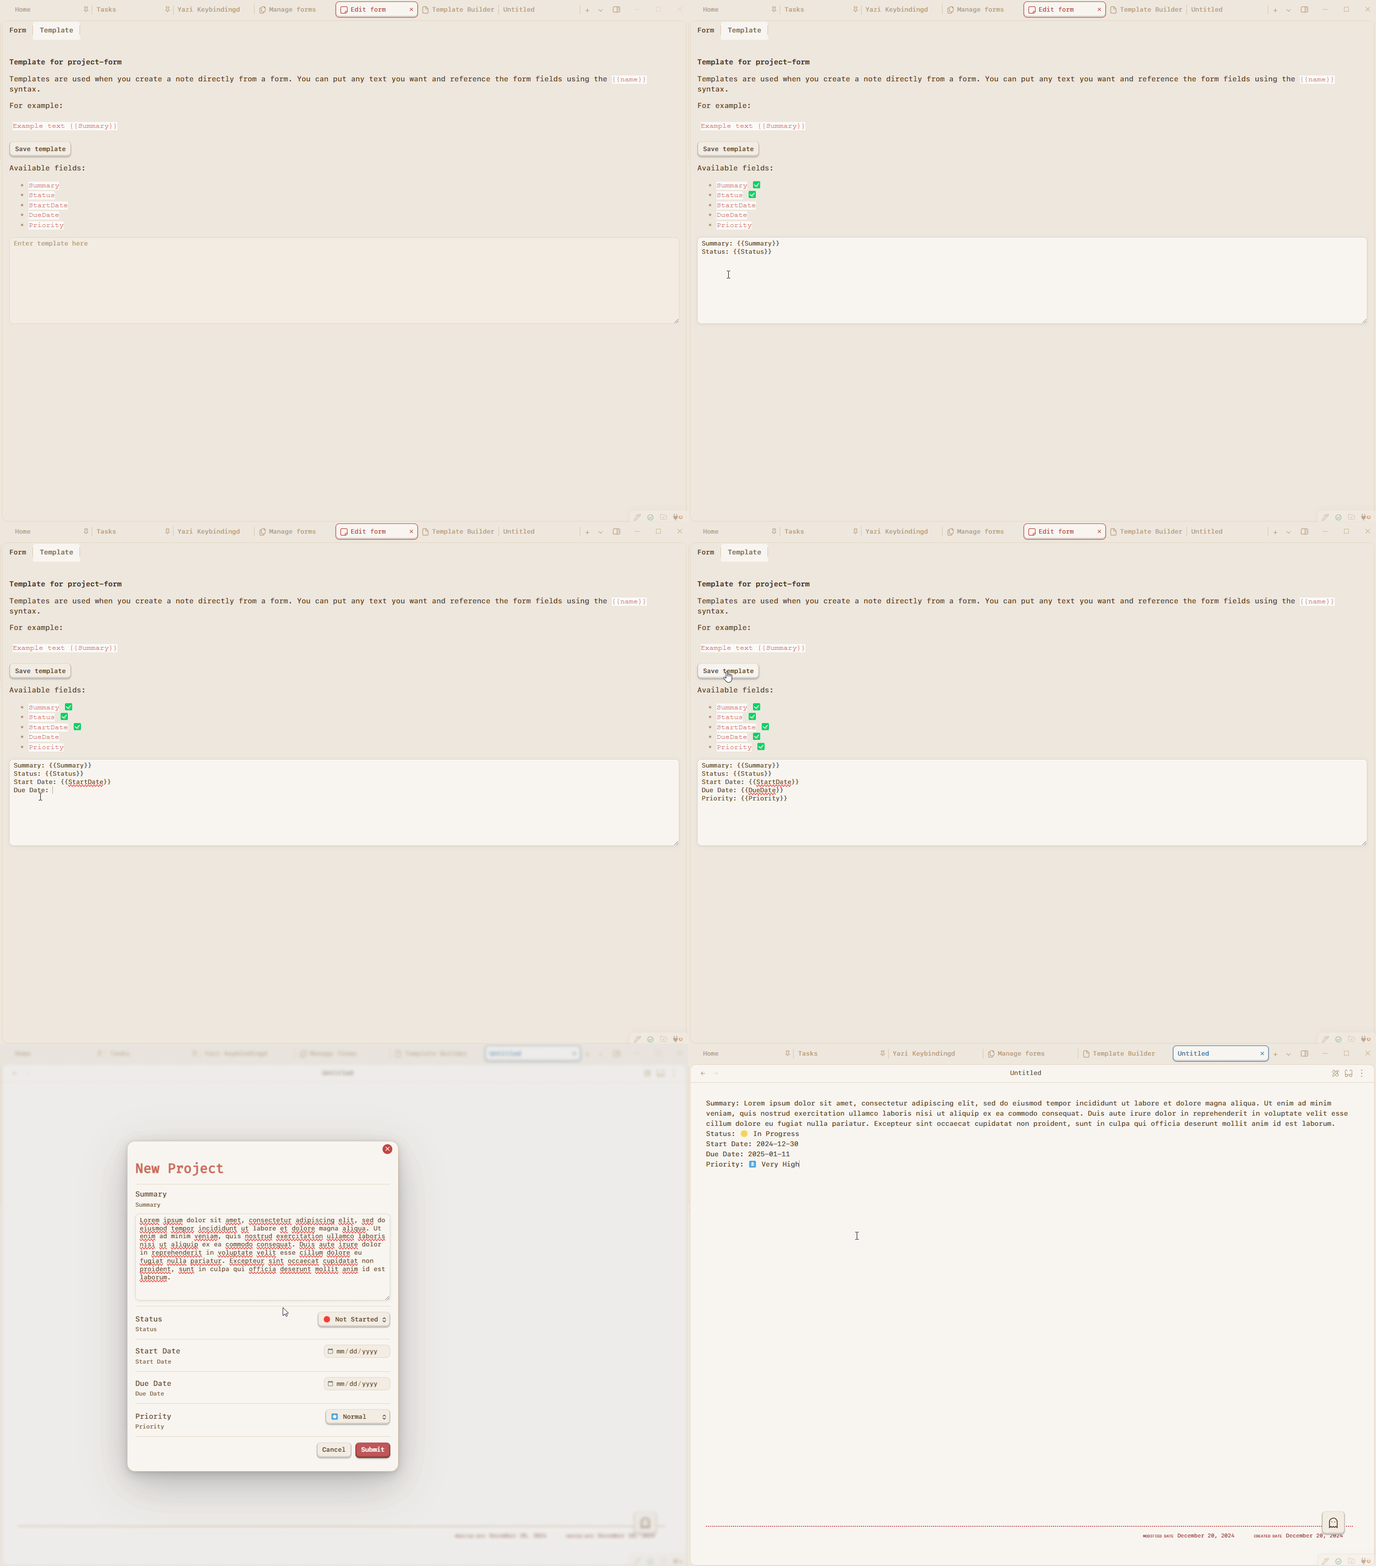
You can also open the form using the template editor. In this editor, you can choose which fields to include or omit in the frontmatter and define the output for the body. At the bottom, you’ll find the JavaScript code needed to trigger the form. Simply copy this code and paste it into a new note within your vault’s templates folder.
Trigger a form⌗
Now that your form is ready to use, you just need to trigger it using a plugin like Templater or QuickAdd.
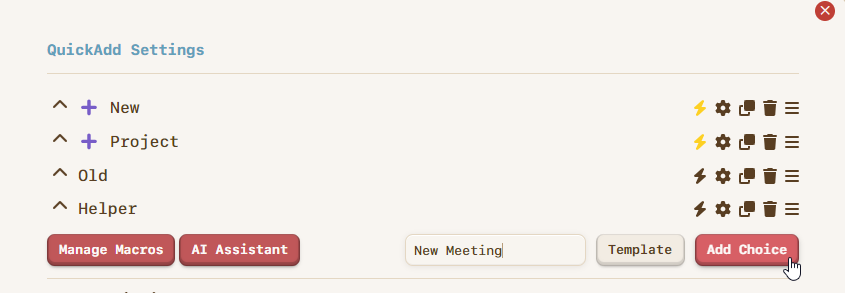
- Open QuickAdd and create a new
TemplateChoice
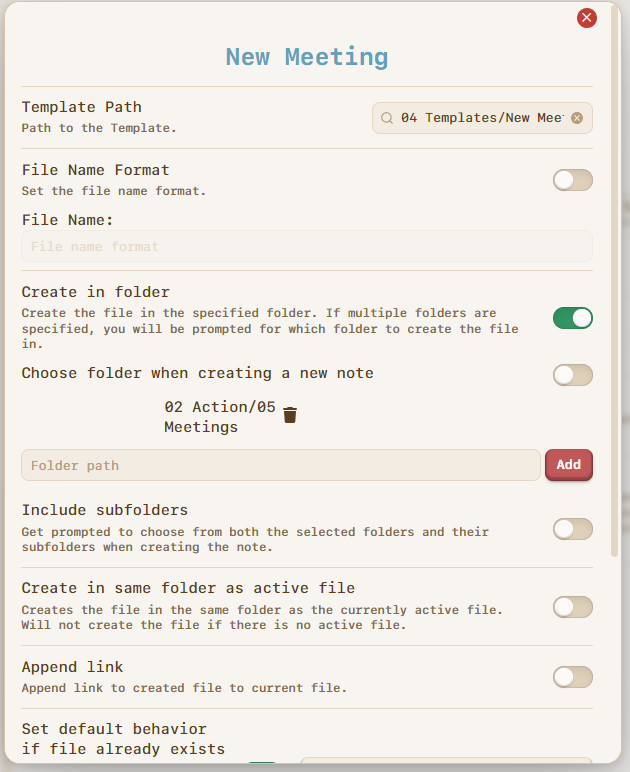
- Enter the path to the newly created template file in the
Template Pathfield, and select the location to save new notes.
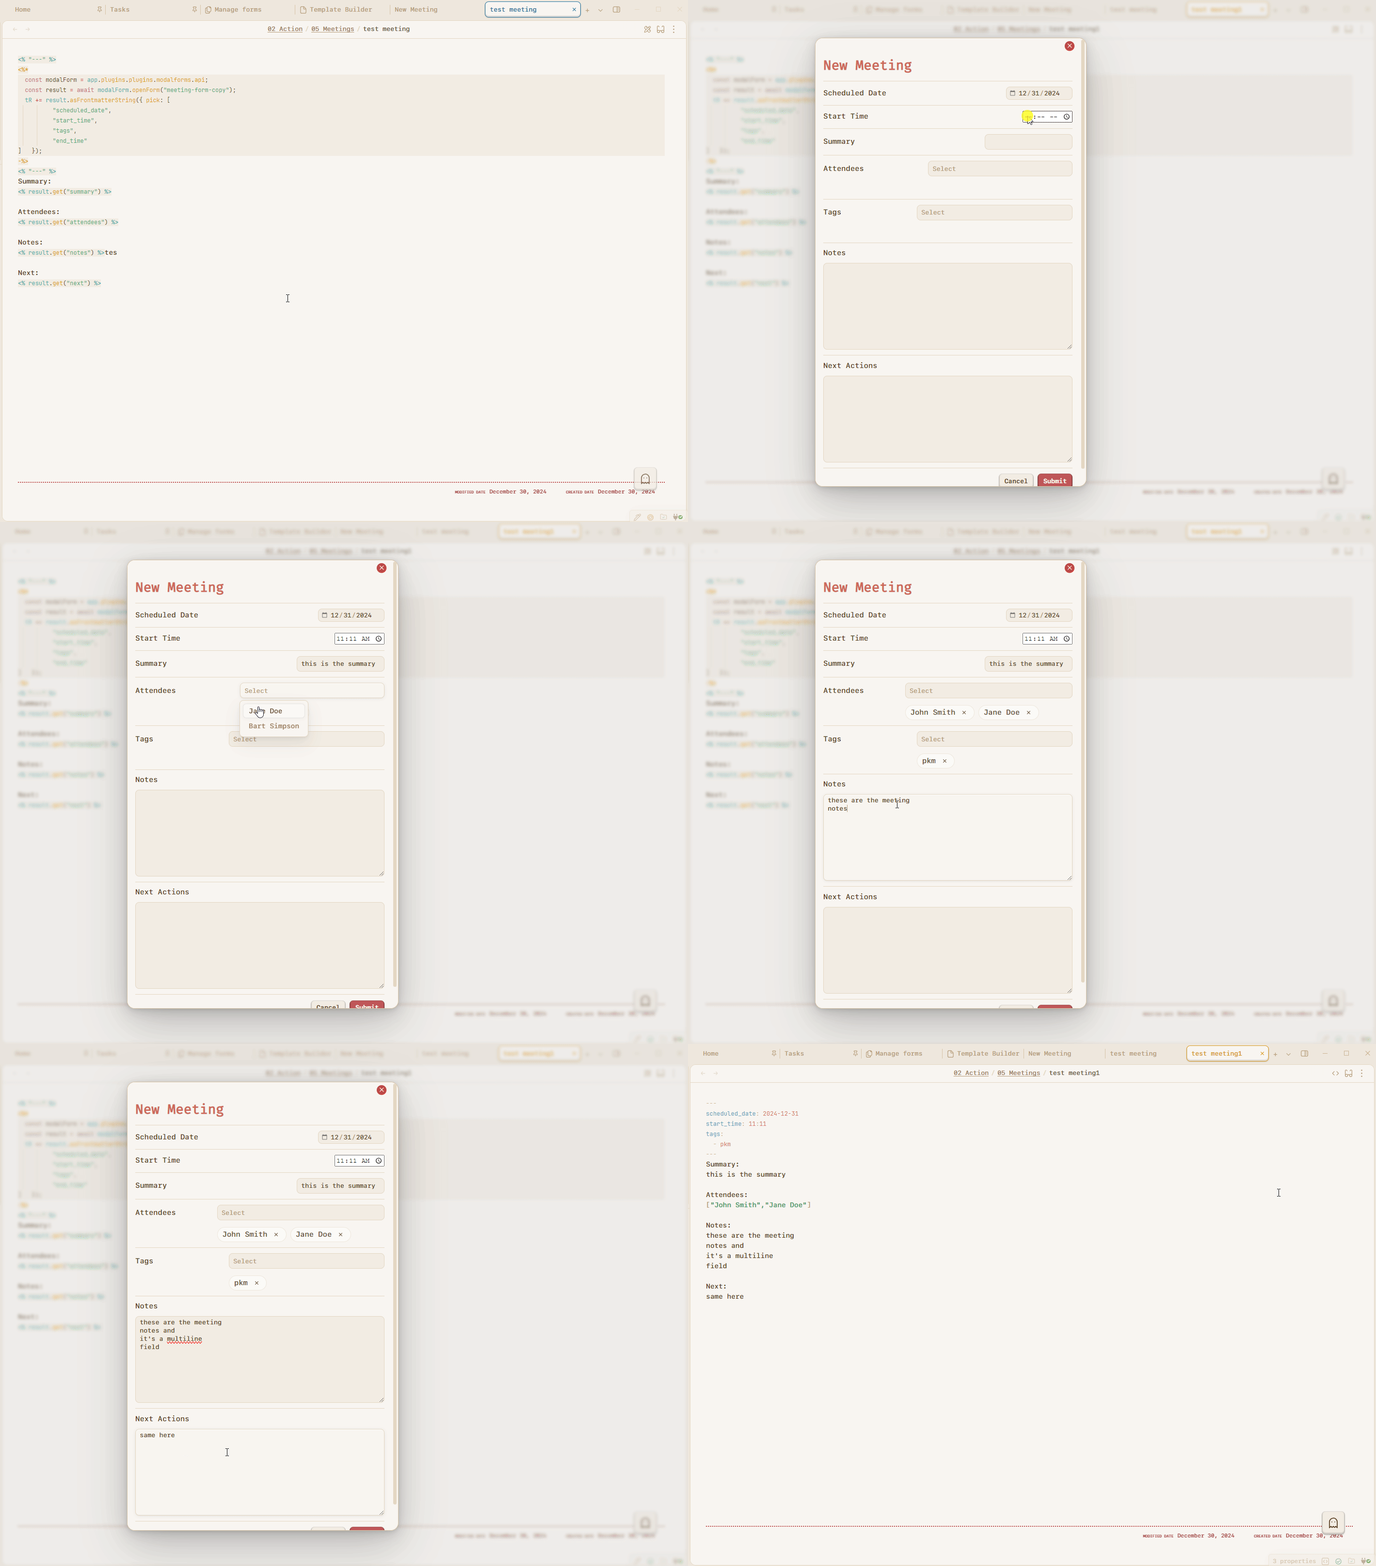
- Now let’s trigger the form:
Form Output Methods⌗
asFrontmatterString()⌗
<% "---" %>
<%*
  const modalForm = app.plugins.plugins.modalforms.api;
  const result = await modalForm.openForm("meeting-form-copy");
  tR += result.asFrontmatterString();
-%>
<% "---" %>
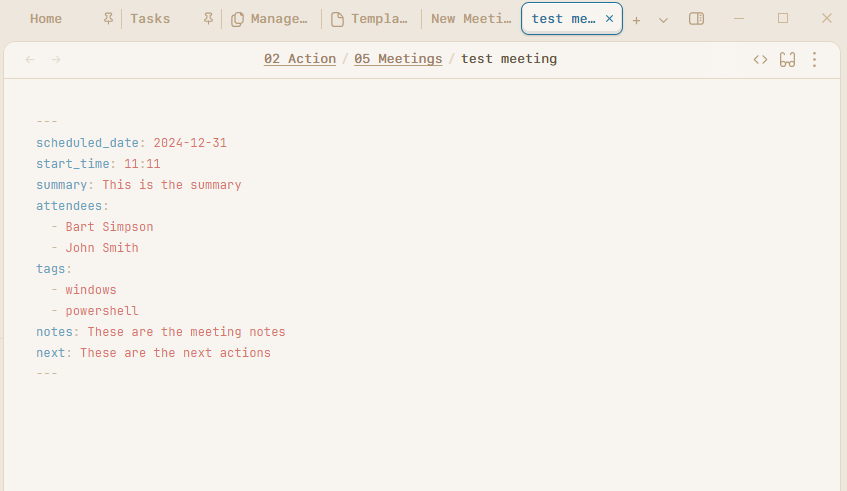
This code outputs all form fields in the frontmatter. Note the form name specified in modalForm.openForm("meeting-form-copy") and how the output is defined in the frontmatter using result.asFrontmatterString(). For example, with our New Meeting form, the output would look like this:
asDataviewProperties()⌗
<%*
  const modalForm = app.plugins.plugins.modalforms.api;
  const result = await modalForm.openForm("meeting-form-copy");
  tR += result.asDataviewProperties();
-%>
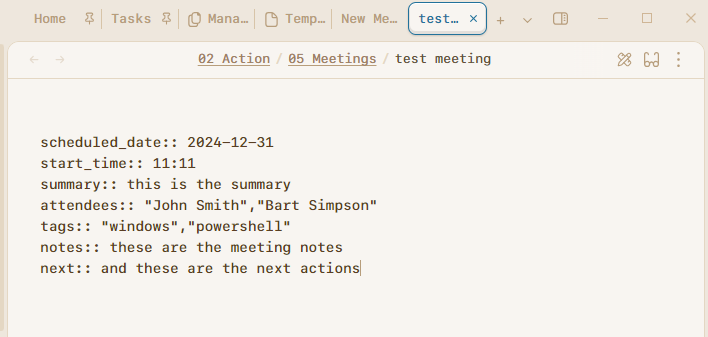
Switching the result method to result.asDataviewProperties() will output the fields as inline Dataview properties. For instance, in our example, the output would look like this:
getData()⌗
<%*
  const modalForm = app.plugins.plugins.modalforms.api;
  const result = await modalForm.openForm("meeting-form-copy");
-%>
This approach enables us to create placeholders for displaying field values using <% result.getValue('field_name') %>.
Example:
<%*
  const modalForm = app.plugins.plugins.modalforms.api;
  const result = await modalForm.openForm("meeting-form-copy");
-%>

### Date

Scheduled to <% result.getValue('scheduled_date') %> at <% result.getValue('start_time') %>

### Summary

<% result.getValue('summary') %>

Attended by: <% result.getValue('attendees') %>

### Areas

<% result.getValue('tags') %>

### Notes

<% result.getValue('notes') %>

### Next Steps

<% result.getValue('next') %>
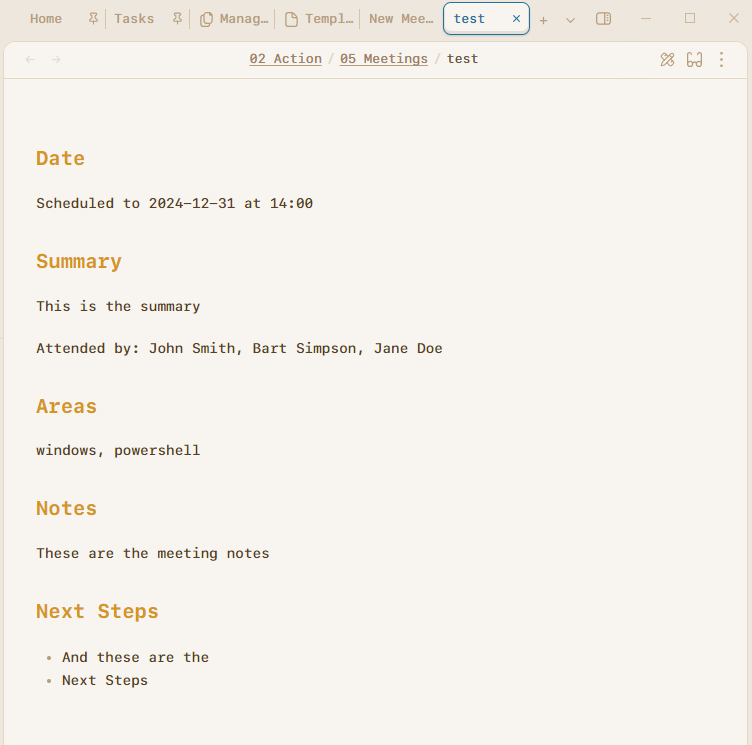
Result:
asString(string template)⌗
<%*
  const modalForm = app.plugins.plugins.modalforms.api;
  const result = await modalForm.openForm("meeting-form-copy");
  tR += result.asString('This meeting took place on {{scheduled_date}} at {{start_time}}. Were present {{attendees}}. In summary, {{summary}}. This is also worth mentioning {{notes}}. The next steps will be {{next}}.');
-%>
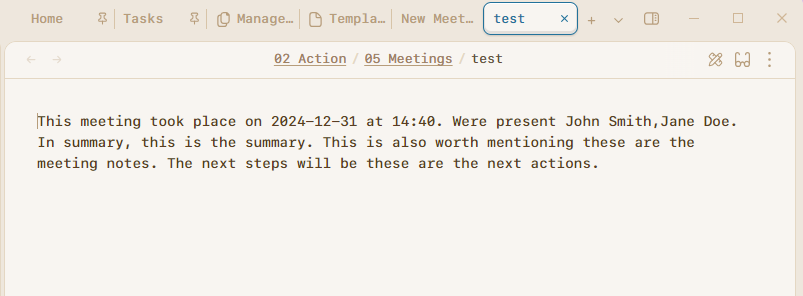
This approach lets us define the resulting template directly within the code.
How Am I Using Modal Form⌗
I’m using this plugin to create all kind of objects in my vault: notes, meetings, projects, contacts, servers, etc. The tasks plugin already has a pretty good modal form, so there’s no need to create a new one. I’ll provide just a couple of examples since they are quite similar.
Meetings Form⌗
My New Meetings form is pretty similar of our example:
Result:
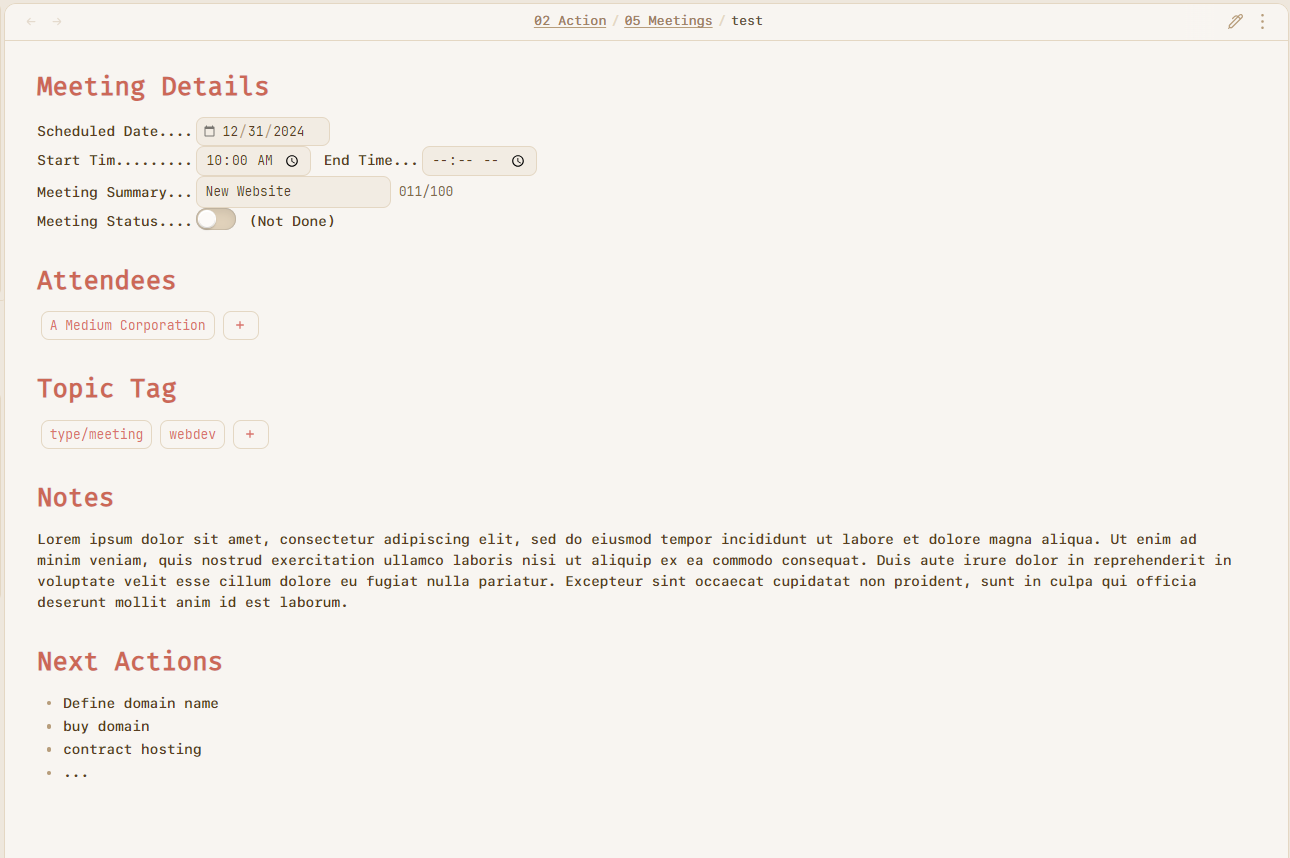
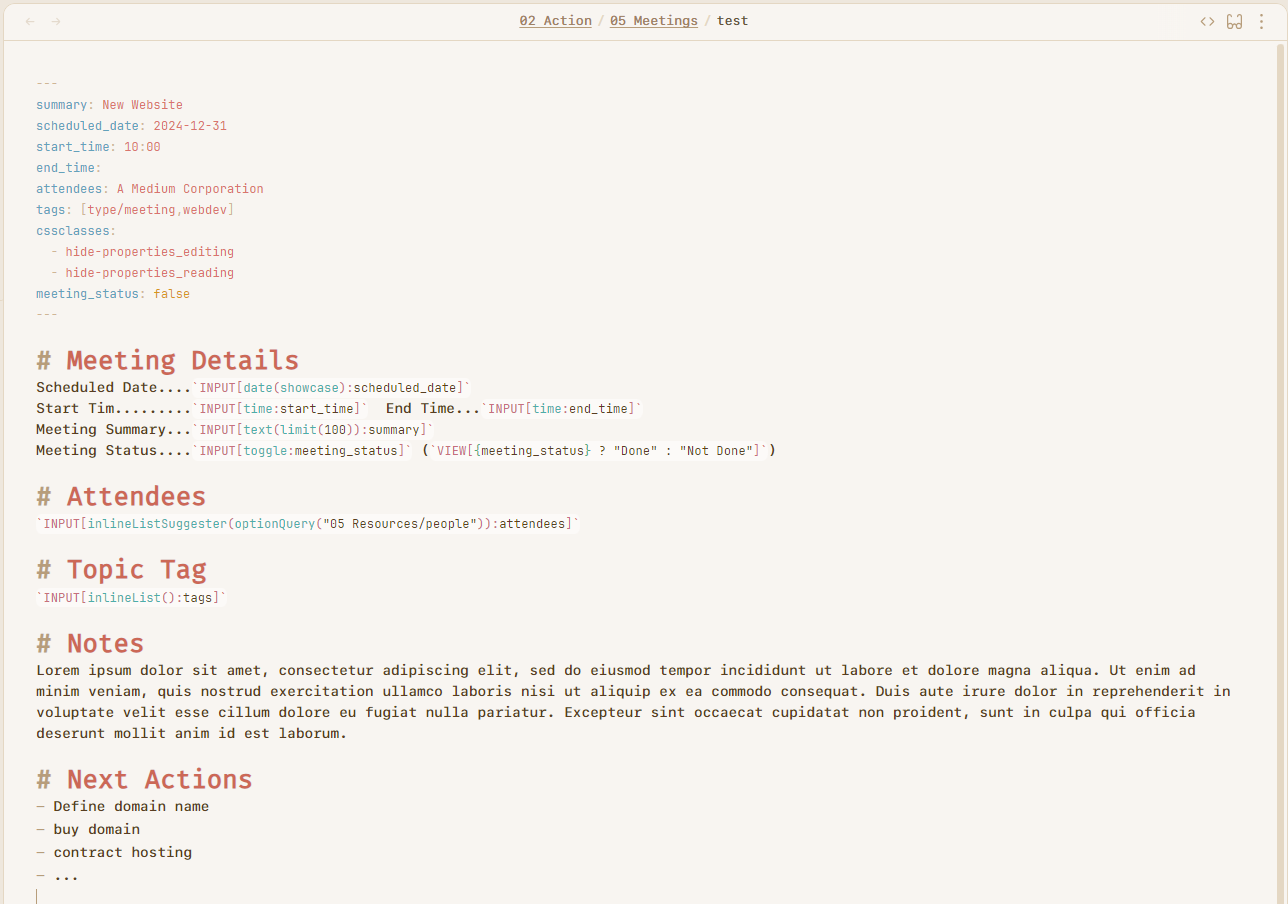
Note that the Meta Bind input values are linked to their corresponding frontmatter fields. For example, the date picker snippet for the scheduled_date field is INPUT[date(showcase):scheduled_date].
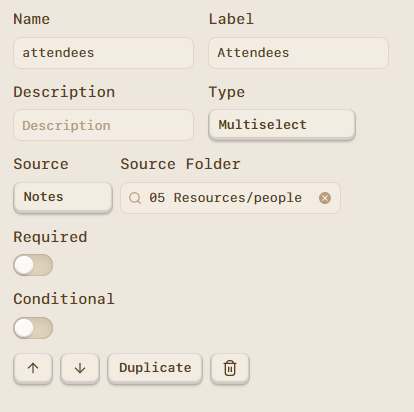
Another noteworthy detail is the attendees’ multiselect field, which sources its options from a folder where I store my contacts.
Projects Form⌗
My New Projects Form is also pretty straightforward.
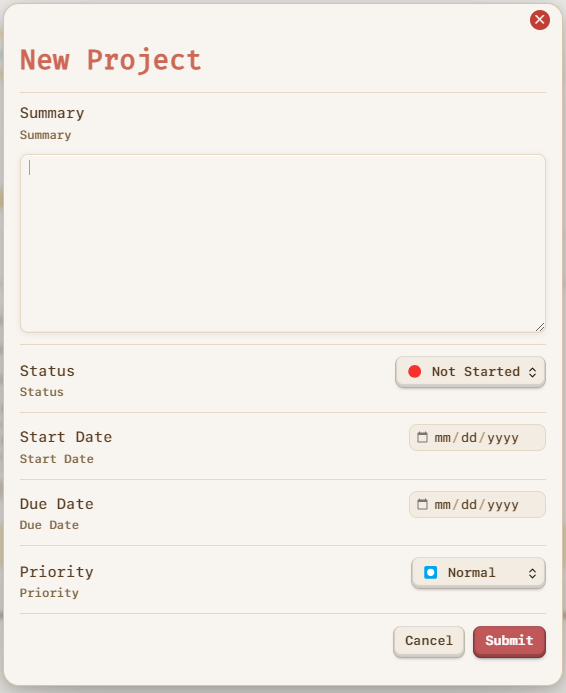
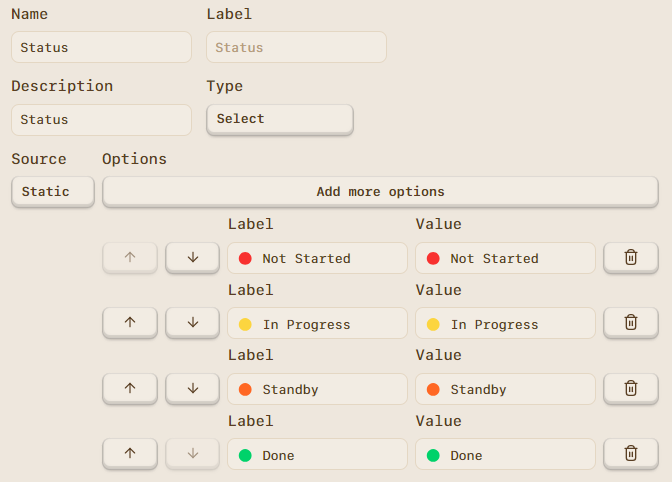
The summary is a text area field, the start and due dates are date pickers, and the status and priority are multi-select fields with predefined static values.
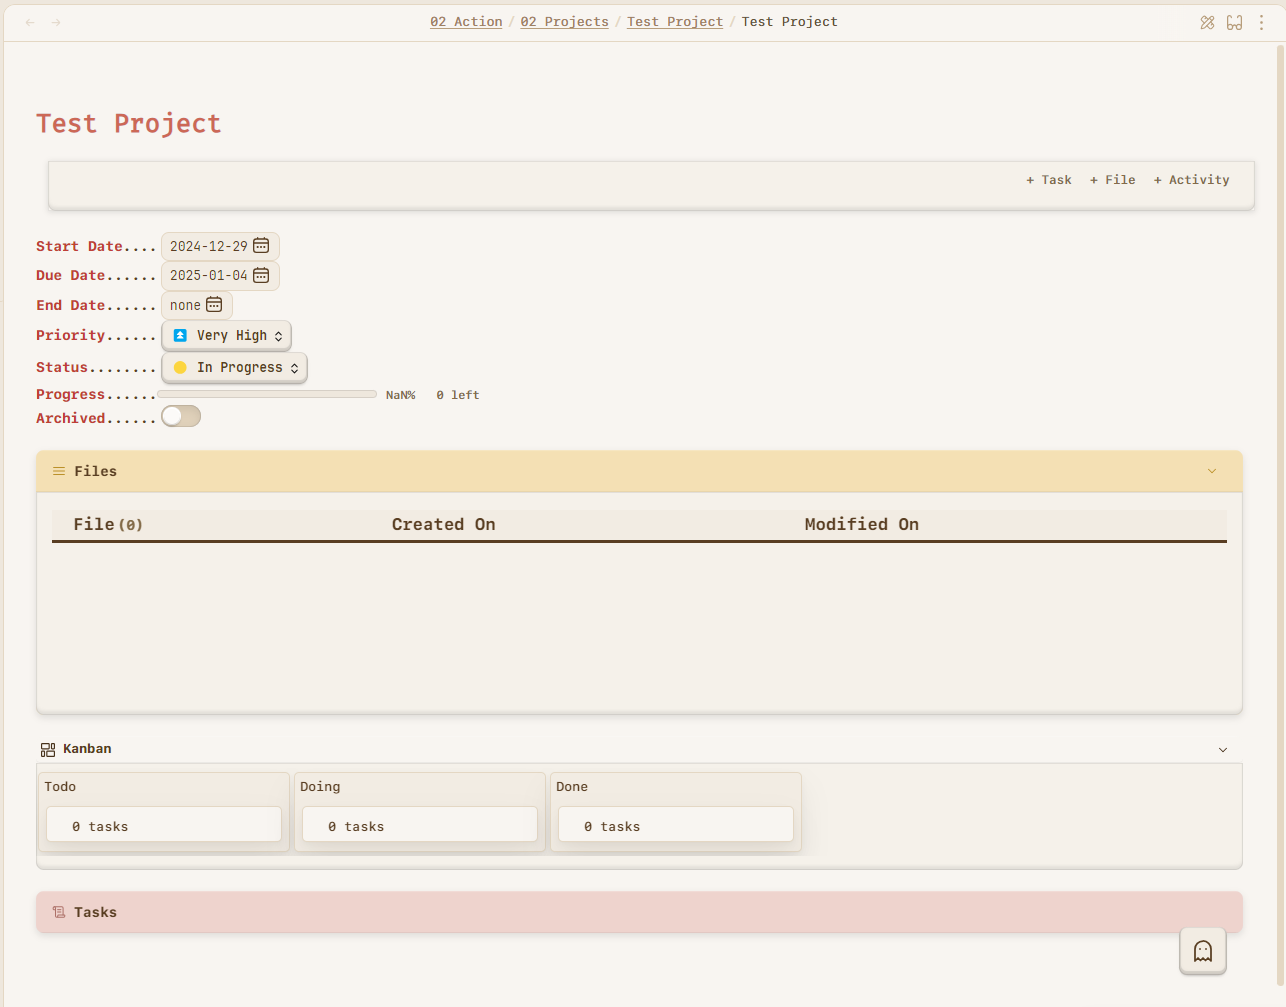
New project resulting note:
Conclusion⌗
The Obsidian Modal Form plugin enhances Obsidian by providing a simple method for capturing structured data. Its integration with other plugins, such as Templater and QuickAdd, makes it even more versatile. Whether used for meeting notes, journals, or task tracking, this plugin helps users stay organized and efficient.
For Obsidian users looking to improve their workflows, the Modal Form plugin is a valuable tool. Its ability to create custom forms reduces friction in data entry and ensures consistency across notes, making it easier to manage information effectively
[GitHub]( https://github.com/danielo515/obsidian-modal-form Open in Obsidian